¶ MR BONES’ WILD GUIDE - New!
This is an updated version of the old Mr Bone’s Wild Guide to making custom head armatures. It is intended for use with Blender 4+ and the most recent releases of
There have been some great improvements with the GR2 Blender plugin as well as LSLIB which make this process a bit more streamlined due to the conversion via gltf. I will list them below under tools.
The guide will be otherwise very similar to the old one, with changes where necessary.
Note that some images will be reused so if interfaces might look slightly different, do not be alarmed.
¶ Tools needed:
• LSLIB (must be the latest beta version!*)
• Blender plugin: BG3/DOS2 Collada Exporter (remember to set the path to the latest LSLIB divine.exe*)
• Blender plugin: BG3 Armature Tools (for Blender 4+ use the updated plugin)
• BG3 Modder’s Multitool (only used to grab the GR2s, the toolkit or LSLIB may also be used for this)
This guide assumes these items have been installed. Despite that, it is hopefully still aimed at beginners. Don’t be afraid of the length, it’s mostly pictures (maybe overexplaining some things to those who are more well-versed but I hope it is more helpful than pure text for those who aren’t).
Note that currently, the supplemental video on Youtube: https://youtu.be/Um_3z2vjMQ8 has not been updated to this newer process. Nor does not cover the initial setup section of this guide and gathering of files so please read on.
*Make sure you have the latest beta version of LSLIB and that you set up the path to its updated divine.exe in the blender exporter plugin preferences.
Also disclaimer: not an expert, and there are more ways than one to do this; many roads leading to Rome and all that.
¶ 1. Setup:
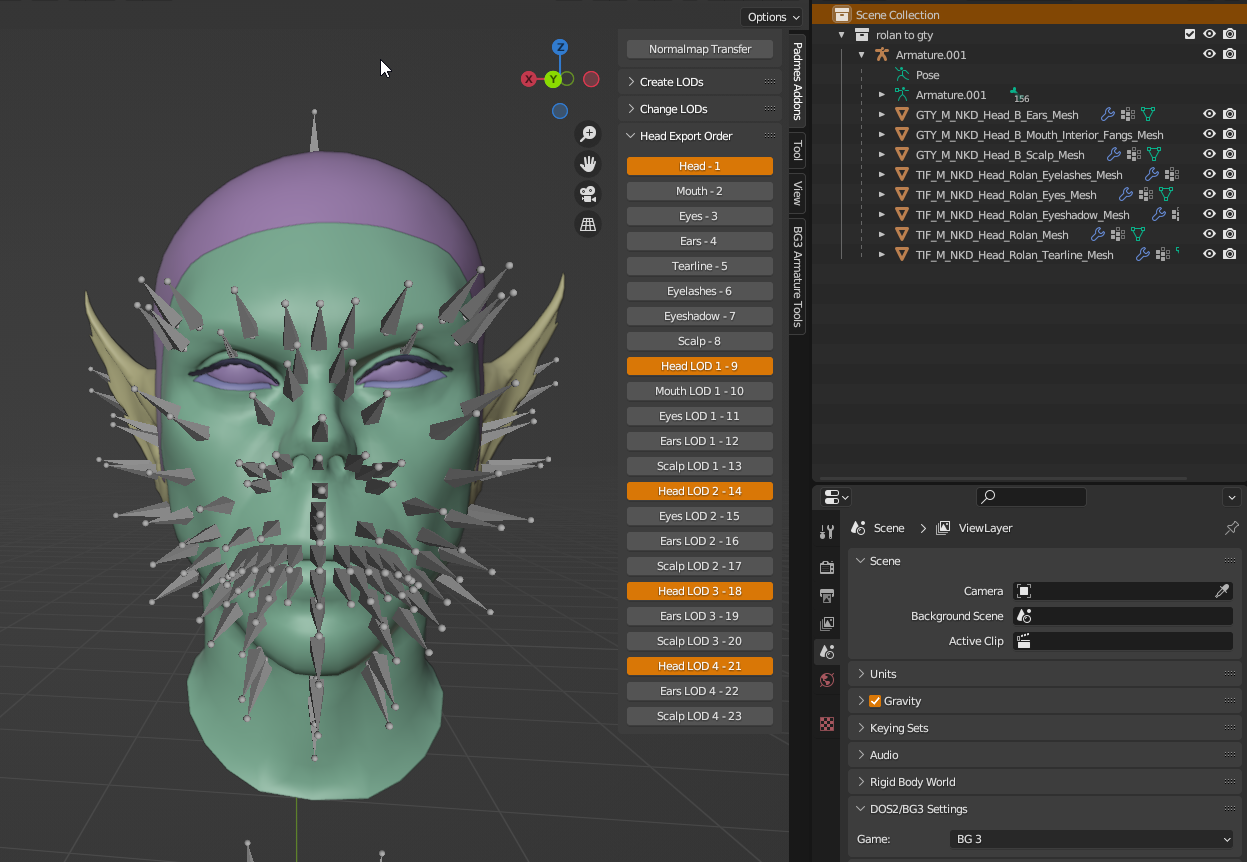
It’s good to first get the items we need before starting. So, we already have our edited head in Blender like so:
¶ 1.1) Collecting Assets
We can use the Multitool to find and grab what we need (it’s handy to toggle the search refine to .gr2 only):
-
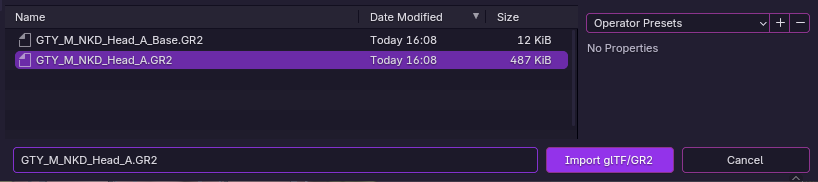
A GR2 of either the vanilla head you have edited, or in my case as I converted a tiefling head to gith I choose a similar head of the type I’m converting to (I will go with GTY_M_NKD_A).
-
A GR2 of the corresponding _Base for that head. This is the skeleton we will be editing later. We can search with the multitool for the name of the head and we will find both:

NOTE for porting between different races/bodytypes: use a vanilla head/base from the race/type we are making the custom head for! “Original head” as seen in the Armature Tool itself is a bit of a misnomer when porting - we don’t need the actual original head).
Extract these but keep them as GR2 and put them in a working folder (wherever, it’s just handy to have all in one place).
So now we have:
• A vanilla head .GR2
• The _Base.GR2 of that same vanilla head• Our custom head already in our blend
¶ 2. Importing to Blender:
For organization, I like to set these up in their own Collections. I will add them like so:
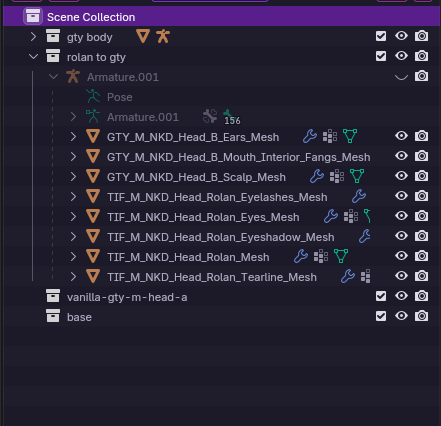
Once the vanilla mesh and base are imported, they can be moved into these categories.
¶ 2.1) Importing the vanilla head
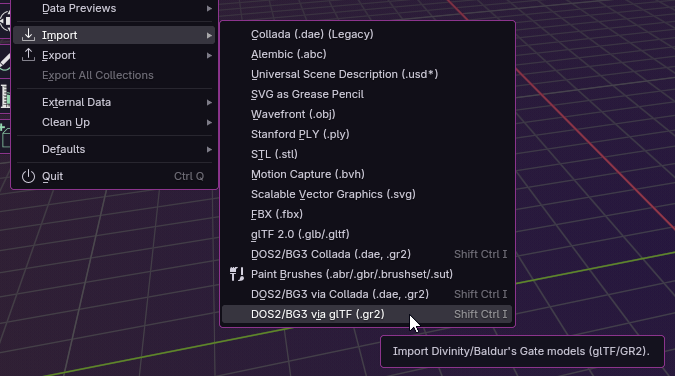
To import the vanilla head .GR2, use the BG3/DOS2 via gltf plugin (IMPORTANT), default settings:
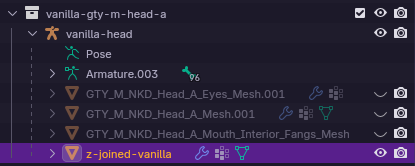
… we can delete the LODs, and all submeshes except Head, Mouth, and Eyes. I have renamed the armature in this case to vanilla-head. Select all three meshes + armature and drag them into the category we made for it (in this case: vanilla-gty-m-head-a).
Good idea to apply transforms as well while these are all selected. With the cursor in the viewport do Ctrl+A to apply all transforms).

¶ 2.2) Importing the base
To import the _Base .GR2, use the same BG3/DOS2 via gltf plugin (IMPORTANT), with the same default settings.
Again, apply all transforms, move it into its own category, and change the armature name if desired (in this case, it has been renamed base).
¶ 2.3) Cleanup
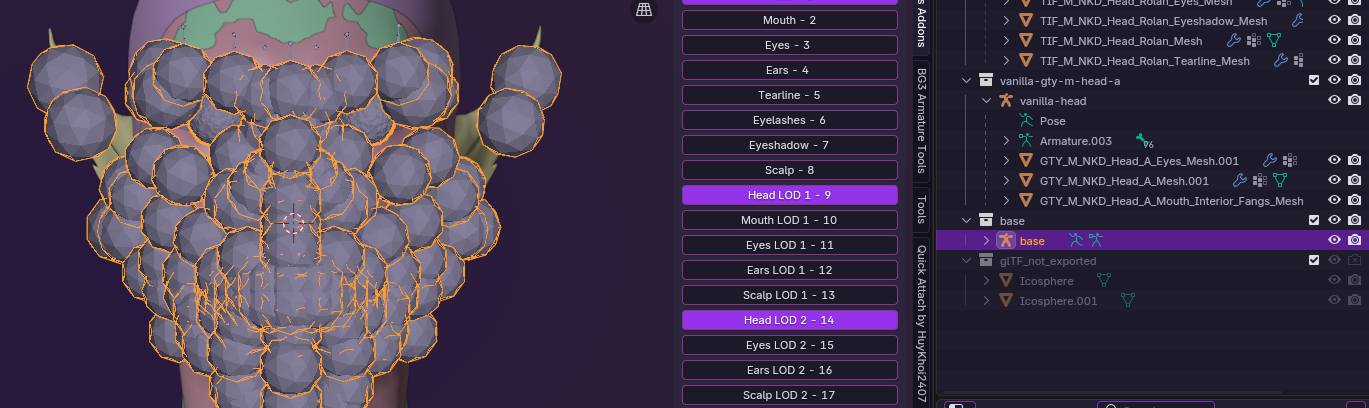
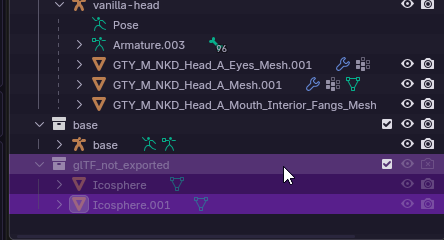
After importing via gltf we can clean up some of the remnants that happen when doing so. Namely, the exploding spheres seen in front of the head, and the “glTF_not_exported” category with a few “icosphere” in them over in the outliner.
This category and its icospheres can be deleted.
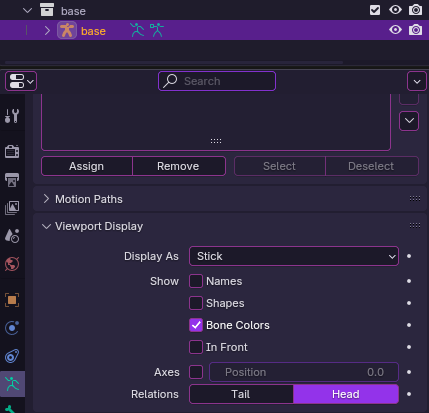
For the spheres in front of the head, we just need to change how the bones are displayed for the armatures.
Select the armature of both the head and the base, find the Data Object Properties (the little green guy), and scroll to/open Viewport Display. Choose to display as Stick, and we can also choose to untick Shapes and In Front. This makes things a bit easier to see.
¶ 3. Preparing the Skeleton:
Good news! This part can now be skipped with the gltf imports we did above!
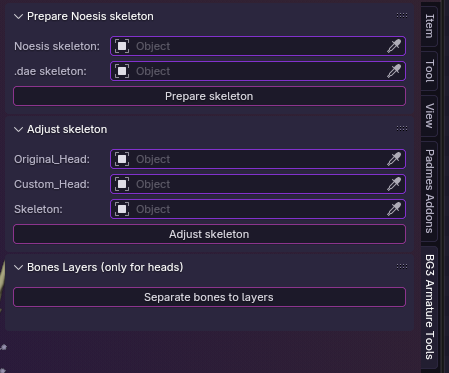
For reference, that means the Prepare Noesis skeleton section of the BG3 Armature Tools is not needed (if you don’t see these tabs between your viewport and outliner, use the “N” hotkey to bring it out)
All of that to say, the Base.GR2 we imported via gltf is already prepared to be adjusted/edited!
If desired, we can already make a backup or 2 of the “Base” Collection to have a fresh ready skeleton on hand in case things go awry or a redo is necessary.
¶ 4. Adjusting the Skeleton:
For this next step we need to prepare the head meshes a bit.
¶ 4.1) Vanilla head prep
For the vanilla head mesh, select the Head, Mouth, and Eyes submeshes and with the cursor in the viewport, Shift+D+Esc to duplicate them, then immediately Ctrl+J to join the duplicates together. In this case, this joined mesh has been renamed to z-joined-vanilla:
¶ 4.2) Custom head prep
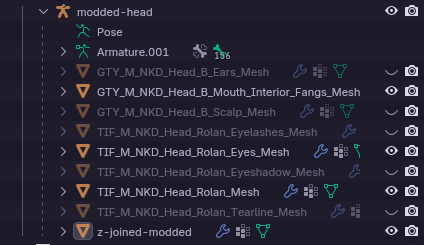
For our edited head, we can first hide all submeshes but Head, Mouth, and Eyes. Then, do the same duplicating and joining as we did with the vanilla meshes. This one has been renamed z-joined-modded. At this point, we can also hide all the meshes except the “joined” ones (keep the armatures visible though!)
So now all which is visible is:
-
Our custom head’s Armature (here is called “modded-head”) + the joined submesh
-
The vanilla head’s Armature (here is “vanilla-head”) + the joined submesh
-
The “base” Armature
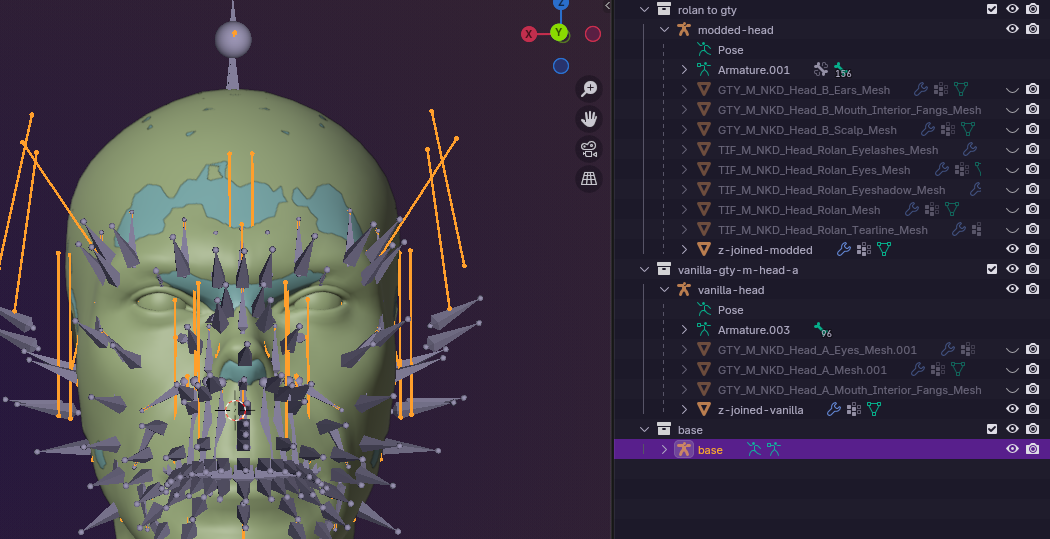
It’s important that each of these has had Transforms applied. If unsure, do them again to be safe: for each joined mesh + their attached armature, as well as the base armature. If any do not have transforms applied, stuff may end up on the floor later.
Additionally, for the next step it is best to have all of these things completely visible as the screenshot above.
¶ 4.3) Adjusting the skeleton
Now we plug the components into the Adjust Skeleton part like so:
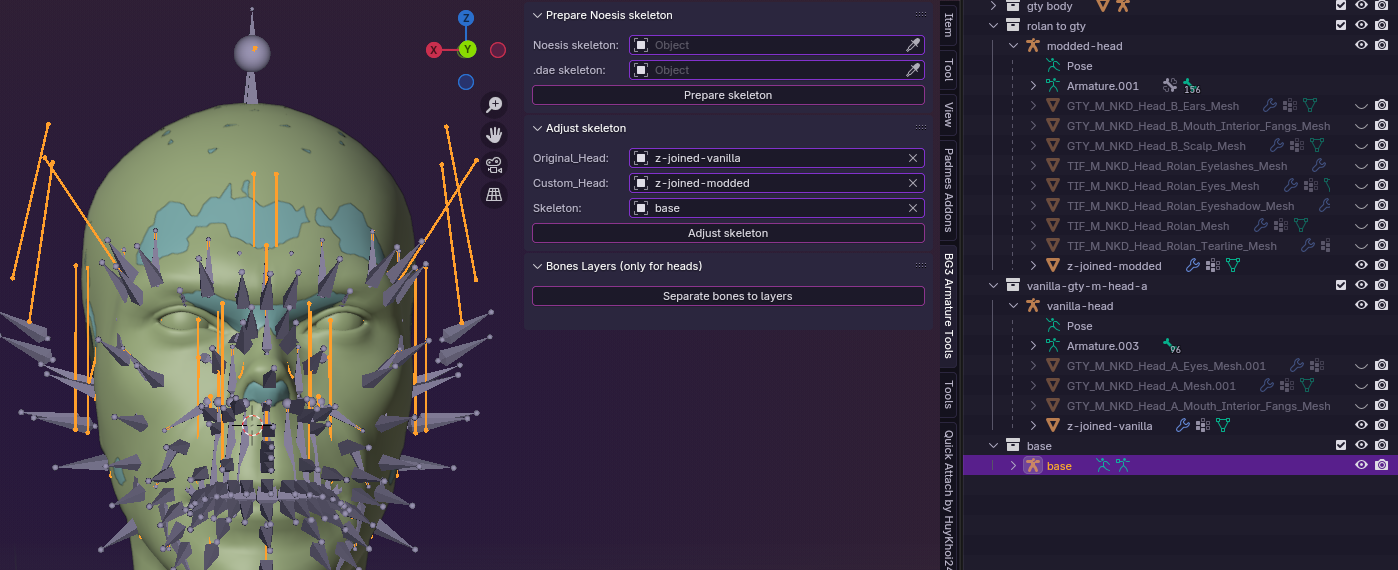
Click “Adjust Skeleton” and if all has gone well so far they should shift slightly. They should not fly away, fall to the ground, or do any shenanigans. Try zooming out a bit to make sure no bones got yeeted anywhere. If any of this happens, probably transforms weren’t applied earlier on and you need to redo.
¶ 5. Final Touches:
The tool has adjusted the main head bones to the new facial geometry for us. But there are a few additional things we need to check and/or adjust manually.
Context: The tool just adjusts the bones on the face and mouth only; from my understanding it does so based on the differences between the vertex group coordinates. And since the ears (or beards) don’t have any data for that they are not in the script and therefore you have to manually move them.
In that vein, the tool will likely run into issues if the vertex groups got too funky anywhere in the head sculpting process.
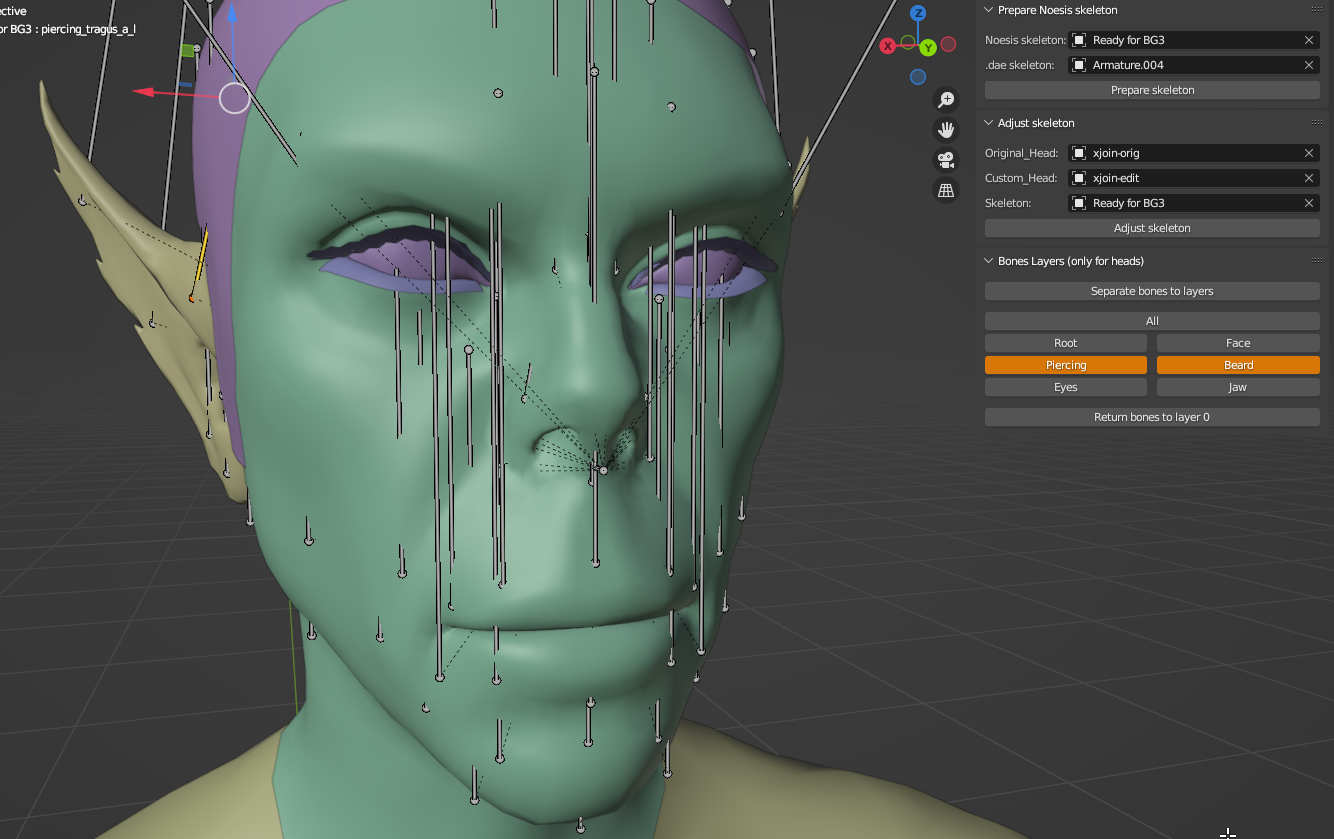
We can also go ahead and hide the vanilla head, the joined-modded submesh of the custom head and the custom head’s own armature. Make visible again our custom head’s actual submeshes:
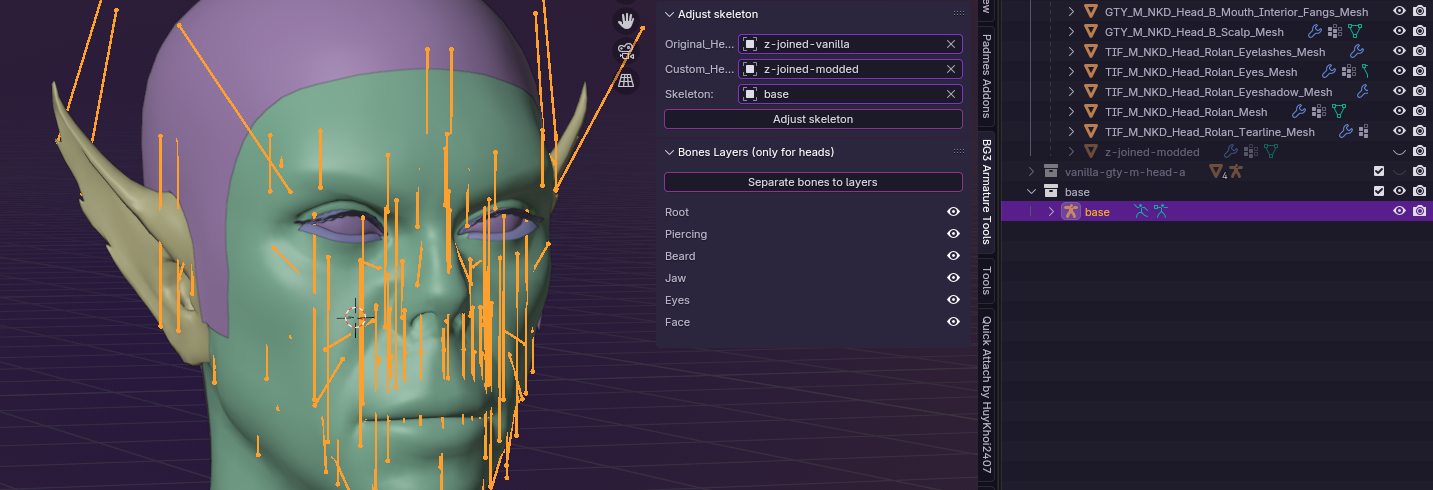
It’s a lot of bones, so to make it easier to edit we can (in Object Mode) click “Separate bones to layers”. In the screenshot above this has already been done, and by hiding the different groups we can more easily see and work with the ones we want to adjust.
Let’s now do some cleanup to make sure the internal bones are placed right. If they are off you could get cutscene weirdness like piercings flying off or very comical expressions (even for Tav).
¶ 5.1) The base bones, the gesture bones, and the wrinkle bones.
if any of these are drastically out of place it could cause: much difficulty getting beards to fit, also piercings/beards which look fine except in some cutscenes where they fly off, or some very exaggerated facial expressions.
For this step I recommend importing the appropriate body for your head. It can be found the same way we found our head/base with the multitool, it will be:
For Body Type 2 Humans/Elves/Half-elves: HUM_M_NKD_Body_A
Replace “M” with “F” for BT1, and “MS” or “FS” for BT 4 and 3 respectively.For other races instead of HUM you use that of the race your head is for (DWR, GTY, HFL, GNO, HRC, TIF…)
Import that GR2 with the BG3 plugin default settings as we did before. Delete any LODs and other extraneous stuff. If desired, change the viewport display options of the body armature to whatever is preferred in this example they are Octahedral - but keep it visible for this is what we will need.
Now back to our Skeleton. First go to Xray mode with Alt+Z and use numpad 3 to get a strict lateral view:
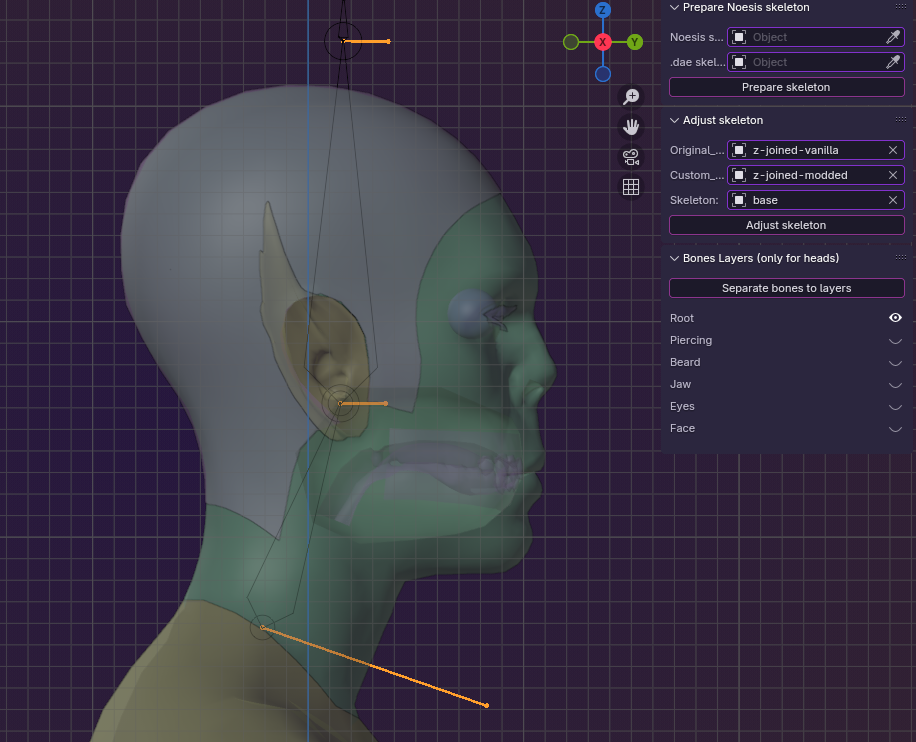
Here you see the “Root” bones selected, and how they converge where the Neck_M and Head_M bones do on the body armature. If any of the following 9 bones aren’t like this, what follows after is an easy-ish way of moving them into place.
The bones we are interested in are:
Root layer: “Head_M”
Face layer:
- 6 little bones called: “gesture_base”, “gesture_01”, ”wrinkle_base”, “wrinkle_01”, “wrinkle_02”, “wrinkle_03”
Piercing layer: “piercing_base”
Beard layer: “beard_base”
First, in Object Mode select both our armature and the body armature. Switch to Edit Mode.
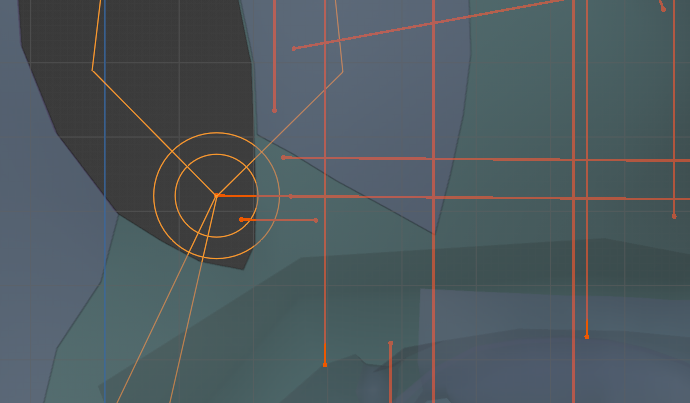
In the above image you can see that some of the small horizontal base bones of our armature are not converging at the Head_M and Neck_M point of the body armature (the octahedral yellow bones on the left).
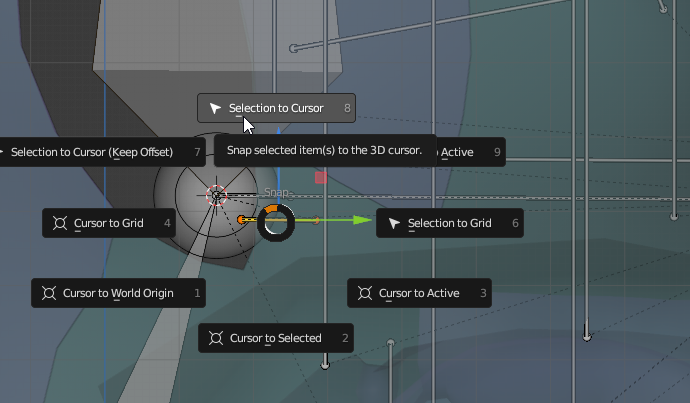
Now we select the end point of either the Head_M or Neck_M of the body armature, then use Shift+S to bring up the radial menu to choose “Cursor to Selected” like so:
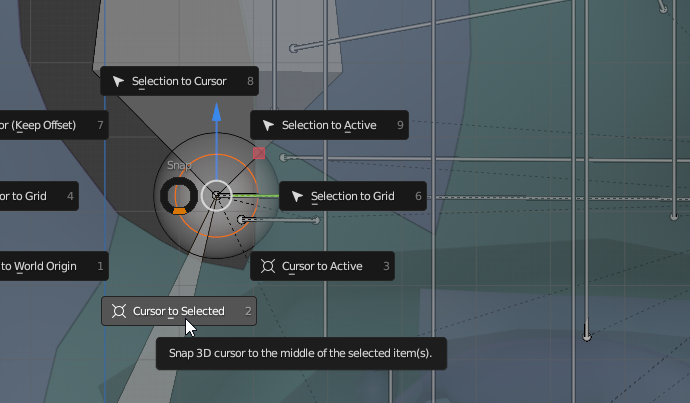
This moves the cursor to that spot. The bones listed above will be the ones that will potentially need to be moved here.
To do so, select the whole bone (in the image below one of the little gesture bones), Shift+S, and this time we choose “Selection to Cursor”.
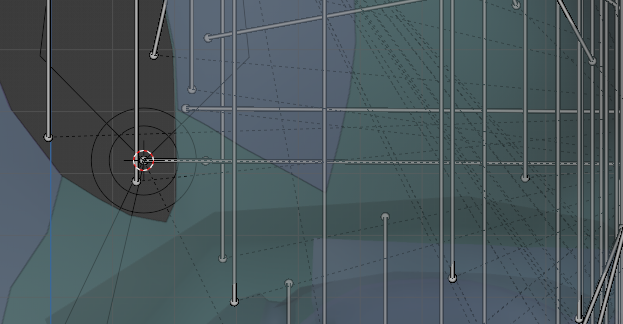
After this it should look something like this, with all of those 9 bones stacked on that point:
¶ 5.2) Piercings and beards
For these just try to move them so that the base ball of the bone is somewhat flush with the surface where you want the piercing/beard to sit. It’s a bit of trial and error but here’s a general visual for face bones: (side note for beards, keep in mind that some of Trips’ accessories use beard bones to attach piercings to: beard_smileline1_ r/l for dimple, beard_upper_lip_m for medusa.)
Regarding deleting piercing bones, some testing has shown that it is possible to delete them (if for example you have made an ear where not all piercings will visually fit, you can just delete the bones of those you don’t want showing).
…and here’s the face/jaw bones if you want to compare how they generally should look::
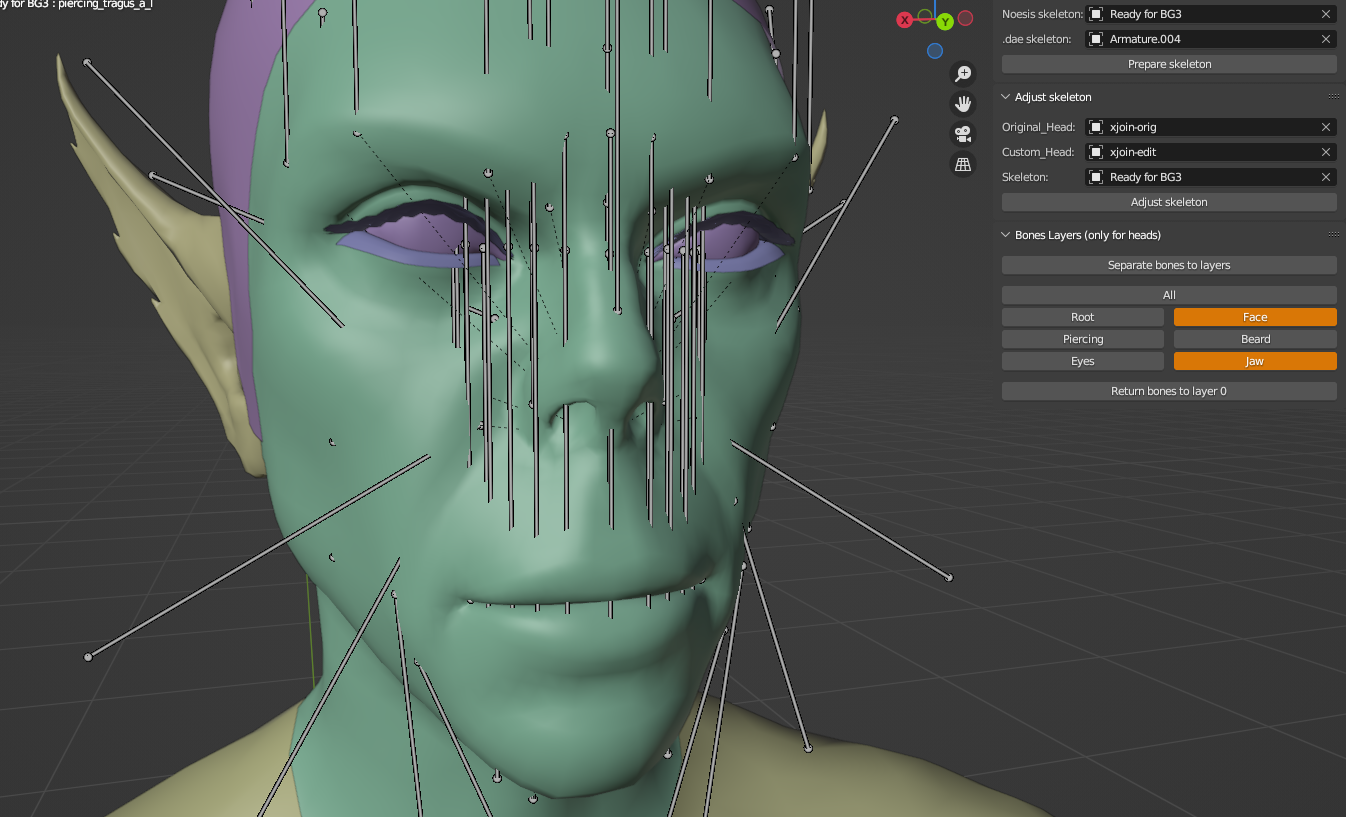
Do not touch the eye bones. The tool should adjust them just fine with the rest of the face bones. If the eye bone clusters are converging in the center of the eyes, that’s good.
¶ 6. Exporting:
Before doing so, make sure all bone layers are visible.
Then Select just the “base” Armature (no head meshes!), apply all transforms.
PLEASE NOTE:
Blender will be phasing out collada/dae so the recommended way to do this is exporting via gltf instead of dae.
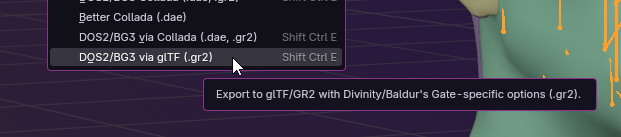
¶ Export with DOS2/BG3 exporter - via gltf:
(Make sure you have saved the fix linked in the orange box above)
File -> Export -> DOS2/BG3 via glTF (.gr2)
Export as GR2 with these settings:
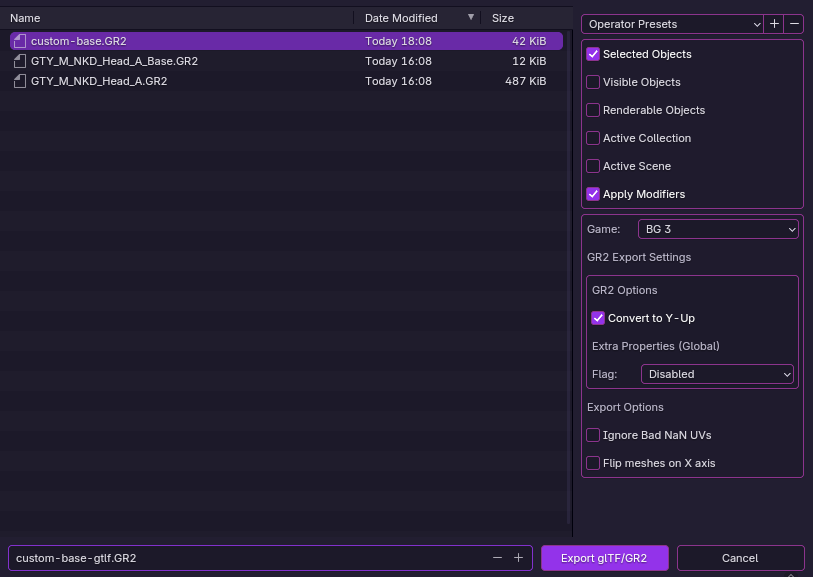
The resulting file should be around 43KB. If it is around 120KB, the settings fix likely has not been applied. If it is upwards of 400KB, there are probably head meshes accidentally exported.
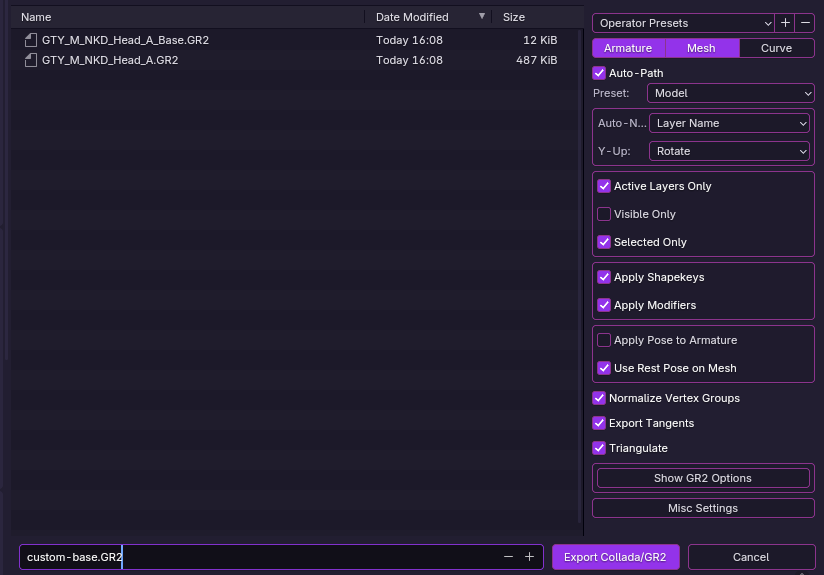
¶ Export with DOS2/BG3 exporter - via dae / collada:
File -> Export -> DOS2/BG3 via Collada (.dae, .gr2)
Export as GR2. Go with default settings, make sure you have “selected only”
Here are the GR2 optionsI have selected by default in case (under Show GR2 Options) :
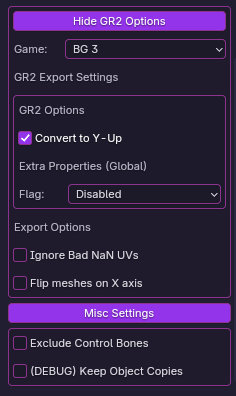
Now we have for our CustomHead.GR2 a matching custom skeleton: CustomHead_Base.GR2 to load into the game.
That’s it.
Well, aside from tweaking the placements of piercings/beards to get them just right. Hotloading the _Base.GR2 as a loose file is very useful for doing this while keeping the game running.

Note about SkeletonBanks
when putting together the merged.lsx for your head, it’s a good idea to grab the whole SkeletonBank from the head merged you used for the base, instead of re-using from a template. Incongruencies seem like they can cause issues like wonky eyes or even invisible heads.