¶ Weight Painting Armor and Clothes
This tutorial is aimed at teaching you the basics of how to weight paint armor and clothes in Blender, so that your custom-made equipment properly moves and follows character animations in the game.
It is recommended to go through the entirety of this tutorial at least once, as most concepts and features are explained only once and considered as known in all subsequent mentions.
If you are a beginner to BG3 modding, please read through the Getting Started with 3D modding tutorial first.
¶ Table of Contents
- Pre-requisites
- Finding similar vanilla armor
- Preparing the vanilla assets in Blender
- Transfering weights
- Testing the weights
- Fixing weights issues
- Part of the armor moves when it shouldn’t
- Part of the armor doesn’t move when it should
- Part of the armor gets deformed too much - Weight painting stiff armor pieces
- Limiting weights
- Final touches
¶ Process overview
- Sourcing: Find a vanilla item in the game files that resembles your custom armor;
- Preparation: Clean up the vanilla mesh in Blender to create a perfect “Donor”;
- Transfer weights: Automate the copying of weight data from the donor to your custom mesh;
- Testing: Parent the armor to the skeleton and pose it to identify errors;
- Refinement: Manually fix specific issues (clipping, stiffness, or lack of movement);
- Limit weights: Ensure compatibility with game engine (max 4 bones per vertex).
¶ Pre-requisites
This tutorial assumes that:
• You have Blender (3.6 and above) installed and you are at least minimally familiar with its interface and general usage.
• You have the Blender plugin BG3/DOS2 Collada Exporter installed to import and export game meshes to and from Blender.
• You have Modder’s Multitool or the Baldur’s Gate 3 Toolkit installed to look up and extract assets from the game.
• You have an armor or clothes mesh that is already fitted to your body type and race of choice.
This tutorial is not going to teach you how to create armor and clothes. It also won’t teach you how to export armor or how to put it into the game.
It is recommended to weight paint your armor and clothing before refitting it to other body types and races.
Now let’s get started!
ㅤ
¶ Finding similar vanilla armor
The first step is to find armor or clothing in the game files that is roughly similar to your custom armor, so that we can steal the weights from it. The closest in shape to your custom armor the vanilla asset is, the better the weight transfer will be.
If your custom armor and clothes hug the body, you can use the vanilla naked Body mesh as a source to transfer weights from instead of vanilla armor pieces.
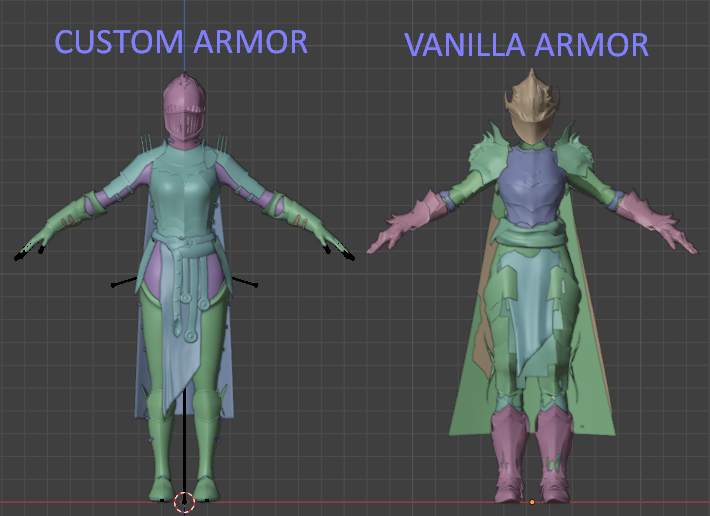
For the duration of this tutorial, we will be weight painting this 100% custom armor set:
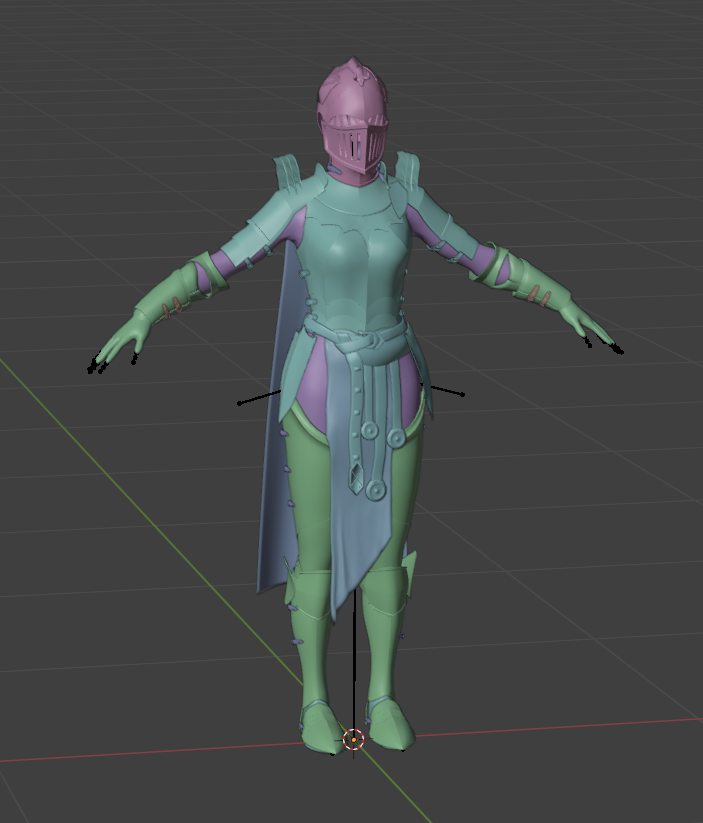
Source: https://artstn.co/m/RGmbB
Since our armor is fitted to Humanoid Body Type 1 (fem), we will search for similar body type 1 assets using the Toolkit’s Resource Manager or Modder’s Multitool.
All armors and clothes in the game have the same naming structure using a combination of tags.
They all start withRACE_BODYTYPE_ARMfor armor andRACE_BODYTYPE_CLTfor clothing.
ㅤ
To find armor for your chosen body type, refer to the following list of tags:
ㅤ
RACE:
DGBfor Dragonborn
DWRfor Dwarf
GTYfor Githyanki
GNOfor Gnome
HFLfor Halflings
HRCfor Half-Orcs
HUMfor Humans, Elves, Drows, Half-Elves and Tieflings
TIFfor the few items that have specific changes made for Tieflings
ㅤ
BODY TYPE:
Ffor Body Type 1 (fem)
Mfor Body Type 2 (masc)
FSfor Body Type 3 (fem strong, only for HUM races)
MSfor Body Type 4 (masc strong, only for HUM races)
ㅤ
So for example if you are looking for armor that specifically fits masculine Githyanki frames, you have to search forGTY_M_ARM
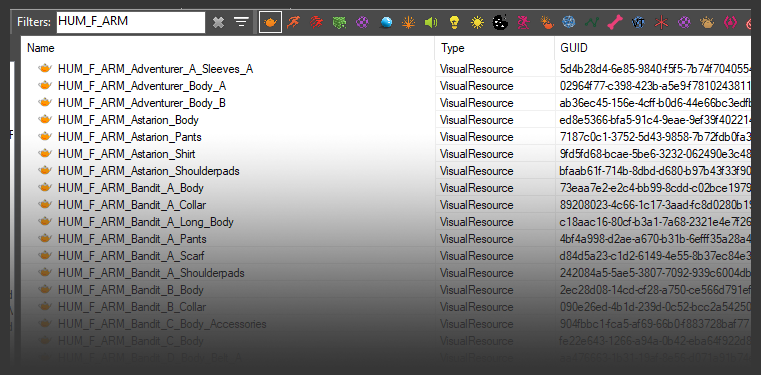
- In our case, we are looking for humanoid feminine armors, so we are going to type
HUM_F_ARMin the search bar of the Toolkit or the Multitool.
The Oathbreaker armor is very close to our custom armor, so we will be using the whole set for out example.
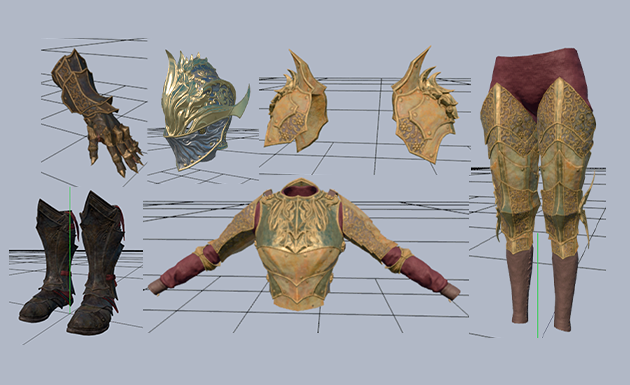
It doesn’t have a front skirt though, so we will also be borrowing the loincloth from the Barbarian starting armor.
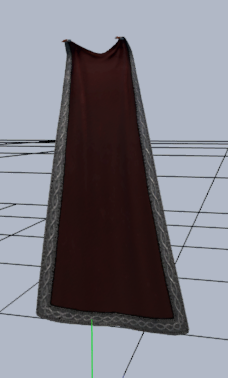
And lastly for the cape we will be using HUM_F_ARM_Cape_Long_A
- Now that we have identified the vanilla armor pieces that are similar to our custom armor, we can go ahead and extract them.
Baldur’s Gate 3 uses the GR2 file format to store its 3D objects and meshes.
In the Toolkit, right click on an asset and click Extract Visual Data to extract the GR2.
In Modder’s Multitool, click on the Extract File icon.
ㅤ
¶ Preparing the vanilla assets in Blender
Now that we have extracted the GR2 files, it’s time to import them into Blender.
We need the Blender plugin BG3/DOS2 Collada Exporter installed to import and export GR2 files to and from Blender.
-
In the same Blender file as your custom armor, import the GR2s by going to
File > Import > .gr2and import all of the GR2s we have extracted, one by one. -
Once you have imported all of the vanilla meshes, select all of them, and with your cursor in the viewport press
CTRL+AandApply All Transforms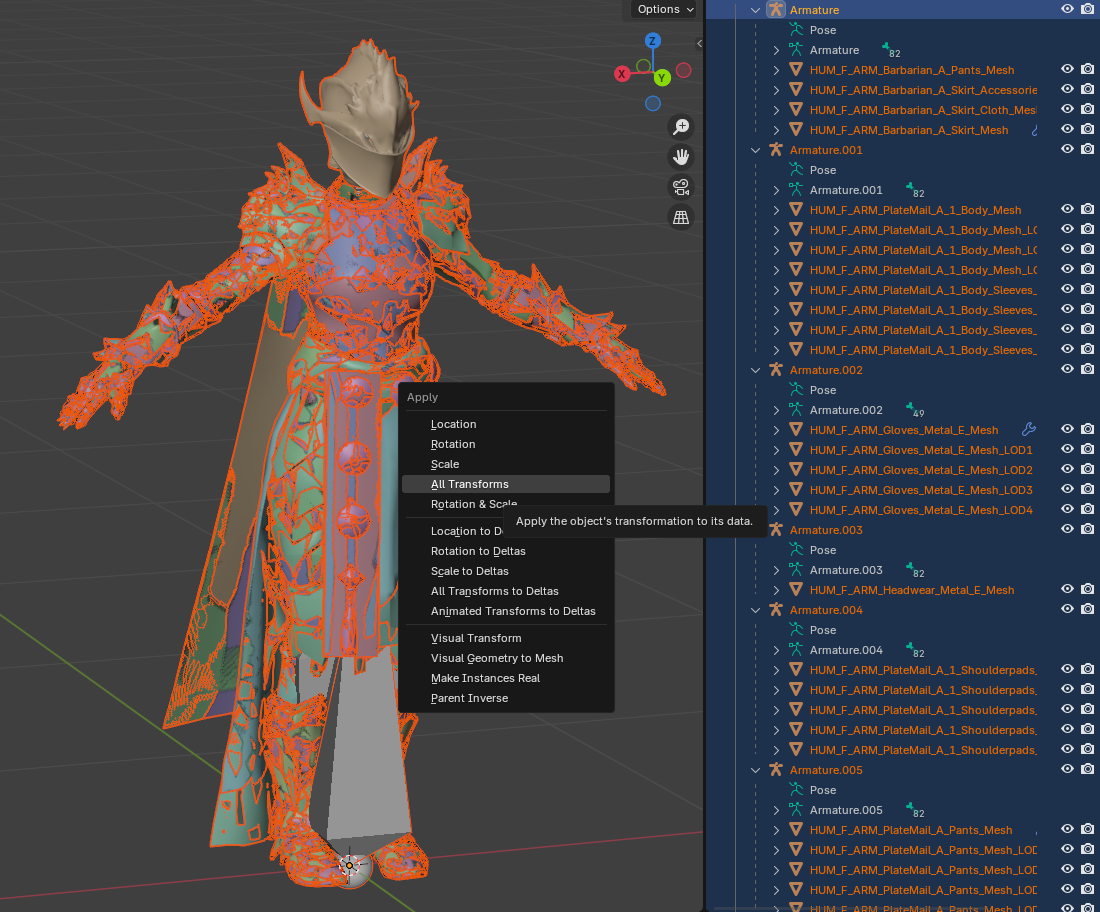
-
Next, you can go ahead and delete all the LOD meshes, we won’t need them.
You can also delete meshes or mesh parts that are useless and don’t match up with your custom armor well. If we don’t delete the extra meshes that we don’t need, they could throw off the weight transfer.
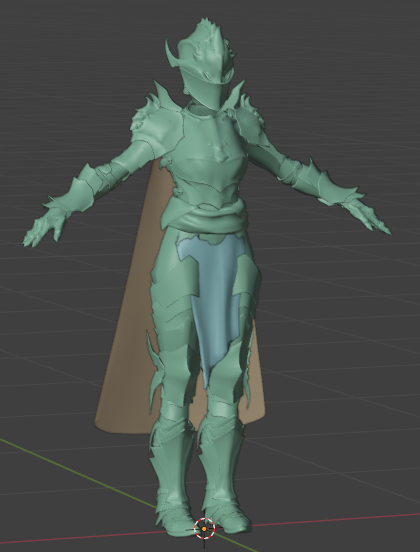
In our example’s case, we will get rid of the hanging belt, the unnecessary barbarian pants and the back skirt of the barbarian skirt.
Keeping the Cloth Meshes is a good idea, you can reuse them to add cloth physics to your skirts and capes, although we will not be covering cloth physics in this tutorial.
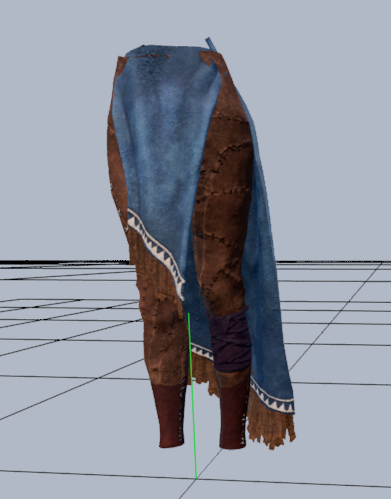
We end up with an armor set that is very similar to our custom armor:
Don’t worry if yours doesn’t match as well, the weight transfer will still work.
- Next, we will merge the vanilla armor meshes together to have an easier time during weight transfer. Even if the vanilla meshes you chose overlap, just merge them together.
The only vanilla mesh parts you shouldn’t merge with the rest are parts like the skirt or the cape, since they will receive cloth physics and are weighted differently than the rest of the armor.
To merge meshes in Blender, select them and press
CTLR+Jwith your cursor in the viewport.
Our vanilla armor is now all cleaned up and ready to be used for weight transfer!
- It’s a good idea to once again select all the meshes and armatures and Apply All Transforms.
ㅤ
¶ Transfering weights
¶ Special Case: Headwear (Rigid weighting)
Are you making a helmet, hat, or glasses?
If so, proceed with the following instructions. Do not use the “Transfer Weights” method. Headwear does not need to bend; it needs to be 100% rigid and follow the head bone exactly.
Instead, follow this specific workflow for headwear:
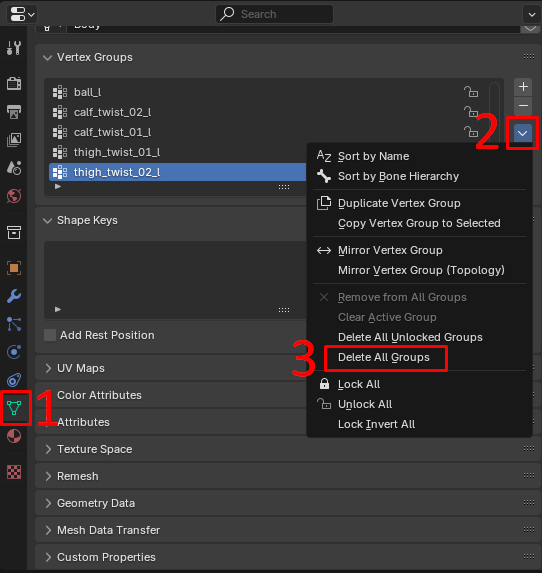
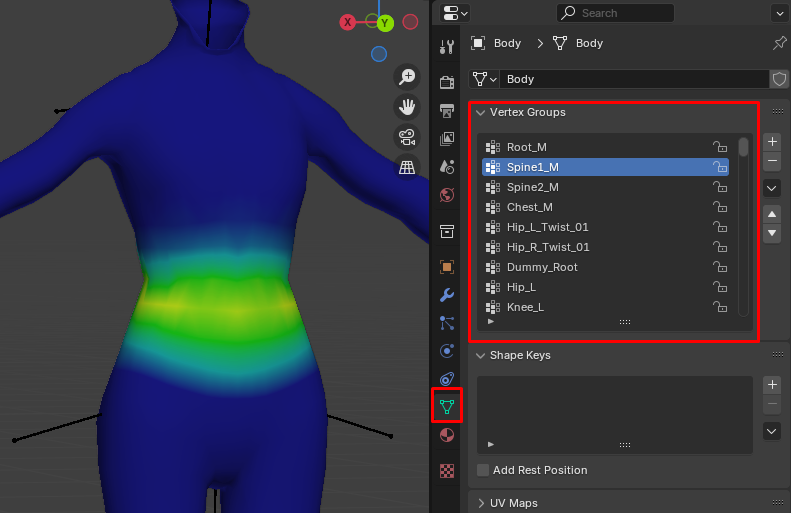
- Select your headwear mesh and go to Object Data Properties (Green triangle icon).
- Under Vertex Groups, click + to create a new group.
- Name the group exactly:
Head_M(the internal game name for the Head bone) - Assign the weight:
- Enter Edit Mode (Tab) and press A to select all vertices.
- Ensure the “Weight” slider below the Vertex Groups panel is set to 1.000.
- Click the Assign button.
- Verify (Optional but Recommended):
- Switch to Weight Paint Mode.
- Your entire mesh should be bright red (indicating 100% influence).
(You can also ensure this by pressing Ctrl+X while in Weight Paint mode to “Set Weight” to 1.0 for everything)
- Proceed to parenting armature.
We will now transfer weights from the vanilla armor to our custom armor.
For this step you need both your custom armor meshes and the vanilla meshes visible in Blender.
Make sure your custom armor doesn’t already have weights.
Delete all the weights from your custom armor before proceeding.
ㅤ
If your custom armor has modifiers (like for example Mirror modifier), make sure to apply all modifiers before proceeding.
- Select the vanilla armor and then your custom armor. They must both be selected at the same time, and you must select your custom armor second.
If your custom armor is separated into several meshes, just choose one mesh to select.
ㅤ - Go to weight paint mode
ㅤ
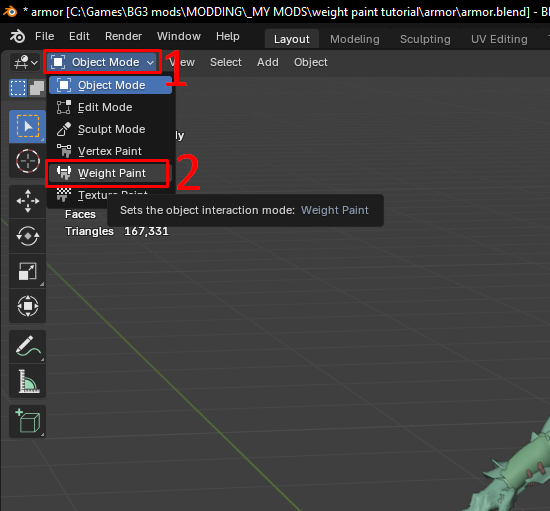
ㅤ - Go to
Weights > Transfer Weights
ㅤ
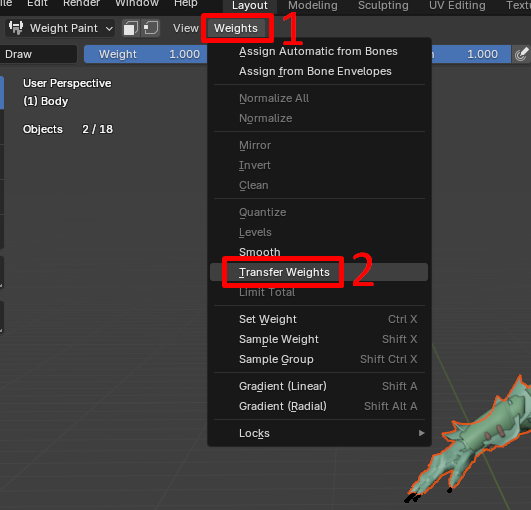
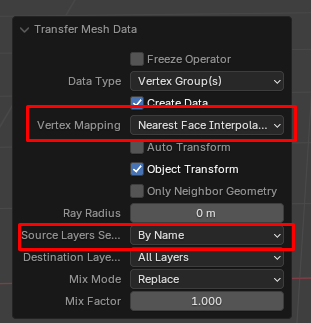
ㅤ - Transfer Weights settings should have appeared on the bottom left of your screen. Expand that window.
ㅤ - Change the
Vertex Mappingsetting toNearest Face InterpolatedandSource Layerssetting toBy Namelike in the picture below. Then click out of that window to confirm the settings.
Congratulations, you have transfered weights from the vanilla armor to your custom armor! You can verify that the operation was successfull by clicking on vertex groups and checking that weight paint is showing up on your mesh.
Now do the same thing for all of the meshes in your custom armor. Exit Weight Paint mode back into Object mode, select the vanilla armor once again, then your next custom mesh, then transfer weights.
Fortunately, the Transfer Weights settings get saved and you don’t have to set those up each time, so that should speed up the process.
For the cape we will transfer weights from the vanilla cape instead of from the vanilla armor. The same principle goes for the skirt.
Select the vanilla cape first, then the custom cape second, and Transfer Weights.
Once you have transfered weights to all of the custom armor meshes, you can hide the vanilla armor meshes as we won’t be needing them anymore.
ㅤ
¶ Testing the weights
Now we need to test the weights to see if any need fixing.
First, we need to assign an armature to our custom armor.
If you haven’t deleted all of the vanilla armor armatures, you can use one of them. If not, just import a vanilla armor GR2, delete the imported meshes but keep the armature.
Armors and clothes use the same armature as the naked body does, so it might be referred to as Body Armature.
-
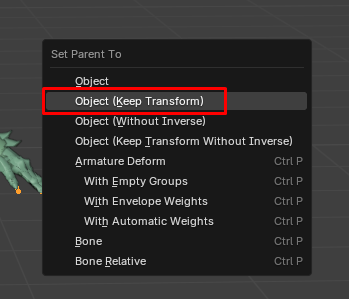
Select all of the meshes of your custom armor, then select the armature last, then press
CTRL+Pwith the cursor in the viewport and Set Parent toObject Keep Transform. This will parent your custom armor meshes to the body armature.
-
For each custom armor mesh, add an armature modifier and set the armature as a target.
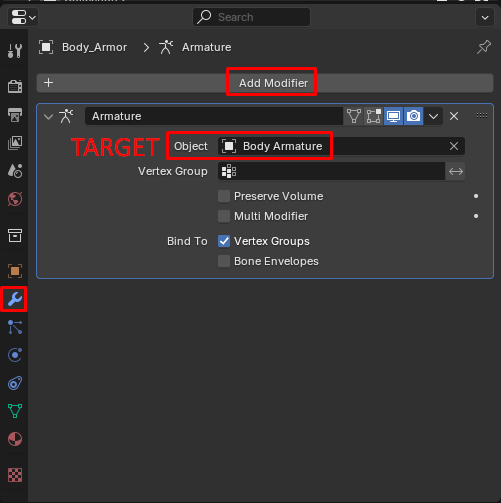
Now our custom armor is properly parented to the body armature and should move with it during animations and movement!
- Once again, select all of your custom armor meshes along with the armature and Apply All Transforms.
We will now test the weights of our custom armor. But first, we will change a few settings in blender to better help us see what we are doing.
-
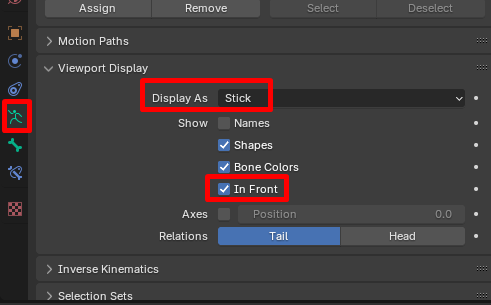
Select the armature and change the viewport display to
Display as Stick, and tickIn Front
-
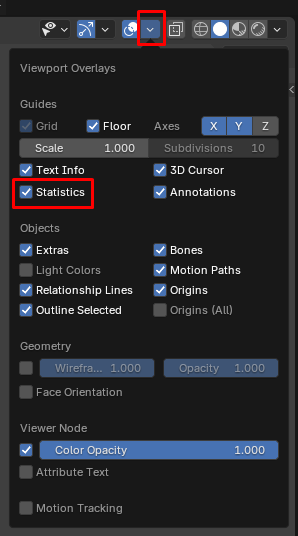
On the top right corner of the viewport, expand the Overlays dropdown and tick
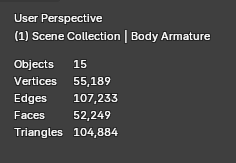
Statistics
A slew of statistics should now have appeared on the top left corner of your viewport. Later on when we select a bone from the armature, its name will be displayed there.
We can now finally test the weights.
-
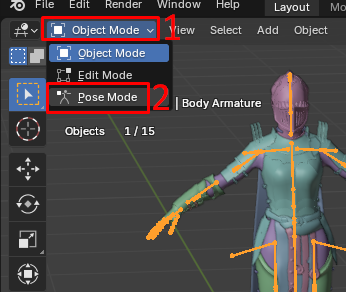
Select the armature and go into Pose Mode
ㅤ
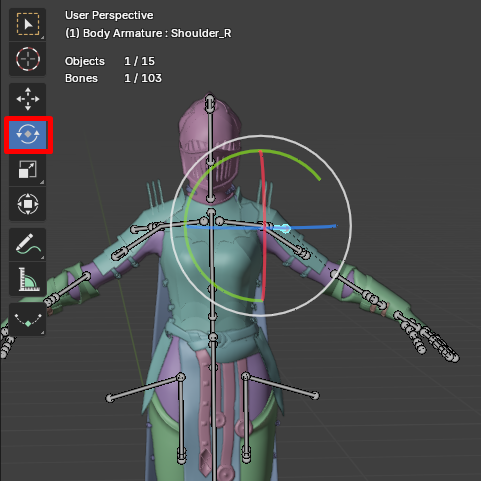
-
Select the Rotate tool and click on a bone, a gizmo will appear that will allow us to rotate bones on their axis.
To test out weigths, we need to rotate bones and see if our custom armor properly moves with it.
The main bones to test and rotate are the following (from top to bottom):ㅤ
•Head_M
•Neck_M
•Scapula_LandScapula_R
•Shoulder_LandShoulder_R
•Elbow_LandElbow_R
•Wrist_LandWrist_R
• All Finger bones 1, 2 and 3
•Chest_M
•Spine2_MandSpine1_M
•Hip_LandHip_R
•Knee_LandKnee_R
•Ankle_LandAnkle_R
•Toes_LandToes_R
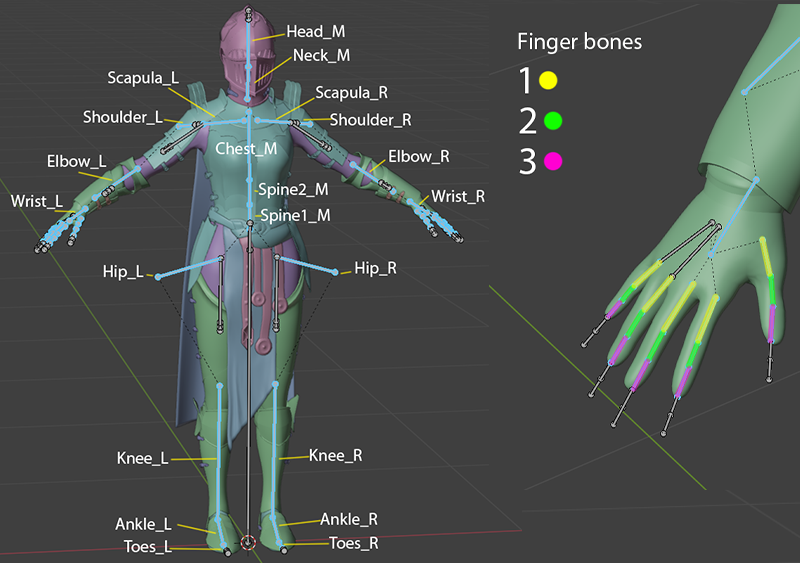
Note that when importing GR2s into blender, left and right are inverted. That is normal.
- Now, select a bone and rotate it by clicking and dragging your mouse over the Rotation gizmo.
Move it around a bunch to see if the custom armor follows.
If your custom armor doesn’t move at all, it could mean that it is not correctly parented to the armature or it does not have weights.
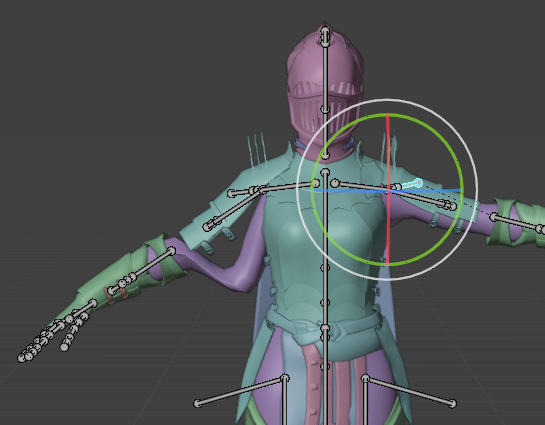
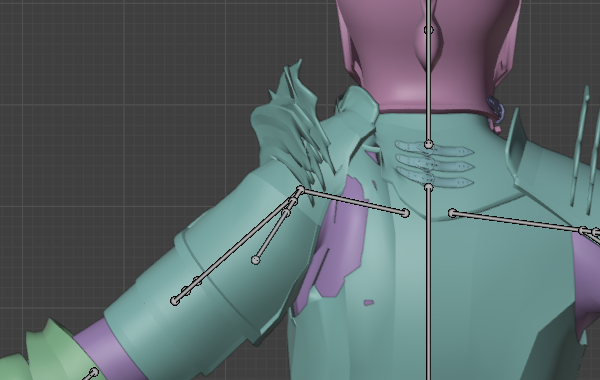
For our example, we will start with checking the Head_M bone by selecting it and rotating it.
We can see that there are a few weighting issues here:
• the body armor pokes through the neck
• the armor neck guard moves with the head even though it shouldn’t
• the neck part of the helmet should not bend like that.
- Do the same for your custom armor and take note of everything that will need fixing.
Taking actual written notes is recommended for this part!
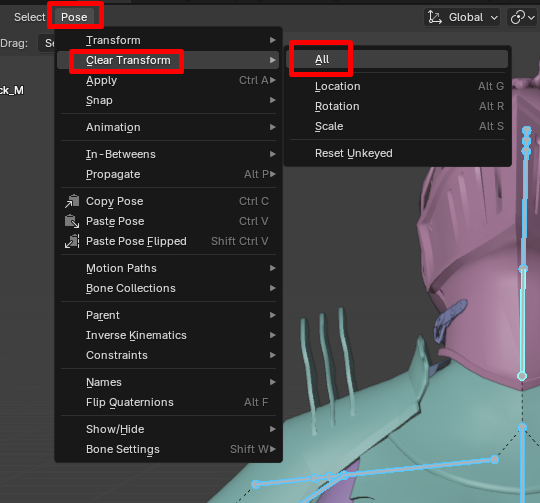
Once you are done checking a bone, you can reset its position by selecting it (you can also select all bones by pressing A with the cursor in the viewport) and going to Pose > Clear Transforms > All
- Now check the other bones. Select them one by one and rotate them around, take note of what needs fixing.
Here are examples other issues you might encounter:
• Part of the armor moves when it shouldn’t
• Part of the armor doesn’t move when it should
• Part of the armor gets deformed too much
If you encounter too many issues, it might be because the vanilla armor you transfered weights from wasn’t suitable, or you forgot to apply modifiers to your custom mesh before doing the weight transfer. You can try to fix all of the weight painting errors in the next step, or you could go back to the section Finding similar vanilla armor and redo things from there to save yourself a bigger headache.
ㅤ
You could also import the naked body you’ve fitted your armor to, and transfer weights from it instead of from vanilla armor, it might give better results.
ㅤ
¶ Fixing weights issues
To fix all of those issues, we have several tools available in Weight Paint mode. We are going to manually paint weights to fix them.
ㅤ
¶ Part of the armor moves when it shouldn’t
Let’s start with fixing the issue of when a part of the armor moves when it shouldn’t. That issue occurs when a part of the mesh has weight paint on a bone it should not be weighted to. To fix it, we need to remove weights.
Always start fixing your weight painting by solving issues that require you to remove weights first. It makes the process cleaner and more straighforward to first remove unnecessary weights and then add weights when they are missing.
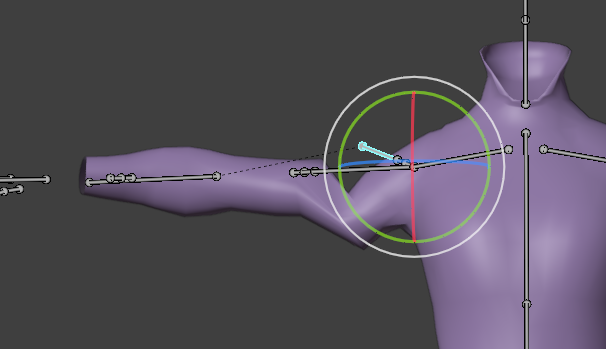
- Stay in pose mode and reset the pose of all bones. Select the bone that causes the issue you want to fix and rotate it so that the issue clearly shows. Take note of the name of the bone.
For our example we will pose the armature like so, where we can clearly see the issue:
- Exit Pose mode and go back to Object mode. The pose should stay as is.
You can hide the other custom meshes for the moment to better see the mesh you are going to weight paint.
-
Select the mesh that has problematic weights, and go to Weight Paint mode.
-
In the Vertex Groups list, click on the bone that you moved in pose mode.
The bone we moved in our example is Shoulder_R
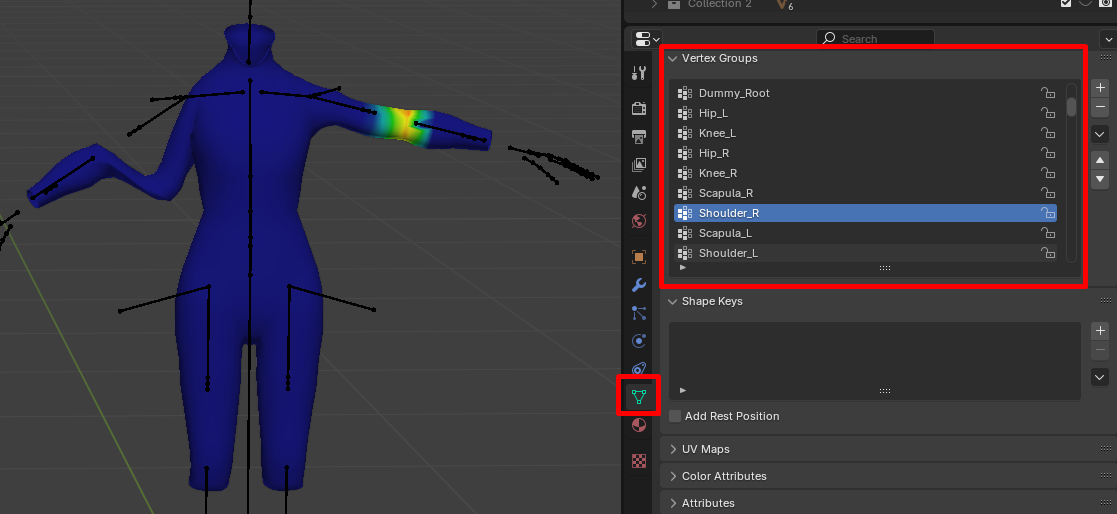
It might not be visible as the example above, but there are actual weights in the problematic area that we need to set to 0 to remove.
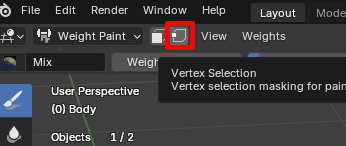
-
Enable to
Vertex Selectionmode
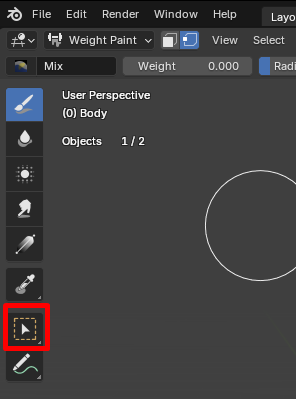
-
Select the
Selection Boxtool
-
Go into
X-Ray mode(Alt+Zwith the cursor in the viewport) and select the problematic area
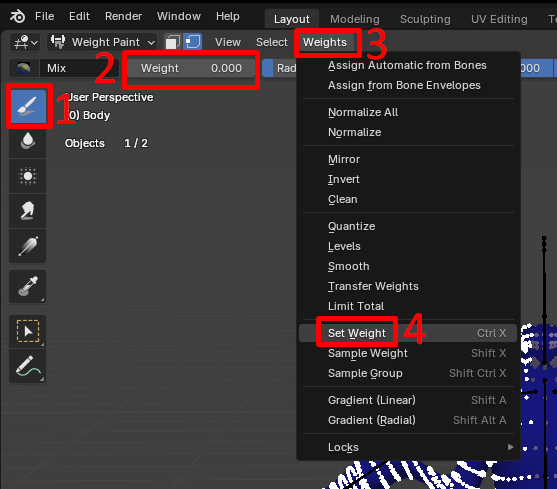
-
Select the
Drawtool, setWeightto0, then go toWeights > Set Weight
Hopefully, that fixed the issue for you. If so, you can continue to the next subsection.
Sometimes like in our example, not much changed even though we set weights to 0. That usually means that the problematic area is weighted to more bones it shouldn’t be weighted to.
In our example, the issue appears when we move the Shoulder_R bone. When moving the Shoulder_R bone, it also moves the other bones down that same arm like Elbow_R and Shoulder_R_Twist. That means all the bones down the that arm could be affecting the problematic area, and we need to set weights to 0 for all those bones.
Fortunately our selection and settings are saved, so we only have to select the bones in the Vertex Groups window and Set Weights again for each of them.
- Set weights to 0 to all the bones that affect the problematic area.
Here I use the shortcutCTRL+XtoSet Weightsmore quickly.
You can also decrease weights to zero directly by painting on the mesh using the Draw tool, but that is less accurate than Set Weight.
Now that the issue is fixed, you can disable Vertex Selection mode (by clicking on it again) for the next step.
Repeat this whole subsection as needed with all the areas that move when they shouldn’t.
Make sure to do it for all your custom armor meshes.
Once we are done removing weights, we have to clean them up. Setting weights to zero doesn’t actually remove them, so this step is crucial to make sure the zero weights are actually removed.
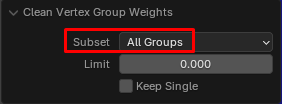
- Still in Weight Paint mode, go to
Weights>Clean
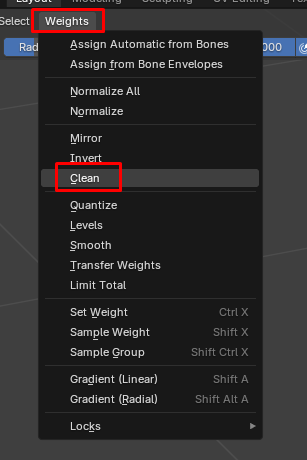
A window appears on the bottom left of your viewport.
- Set the Subset to All Groups and click out of there to confirm.
Do Weights > Clean to all the other custom armor meshes.
ㅤ
¶ Part of the armor doesn’t move when it should
To fix parts of the armor that don’t move along a bone when they should, we need to add weights to that bone.
If the weight transfer goes well, this issue should hardly arise.
However for the sake of being thorough, we will go through how to add weights.
- Select the armature in Object mode, then go to Pose mode and reset the pose of all bones. Select the bone that causes the issue you want to fix and rotate it so that the issue clearly shows. Take note of the name of the bone.
For our example we will pose the armature like so, where we can clearly see the issue:
-
Exit Pose mode and go back to Object mode. The pose should stay as is.
-
Select the mesh that has problematic weights, and go to Weight Paint mode.
-
In the Vertex Groups list, click on the bone that you moved in pose mode.
The bone we moved in our example is Shoulder_L
When we check the weights for that bone however we can see that it is actually correct.
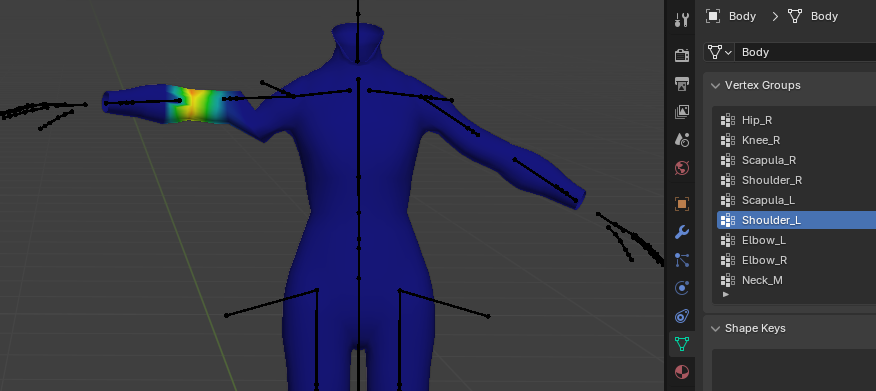
We can tell that it is correct by comparing it to the opposite arm (where the weights are already all correct).
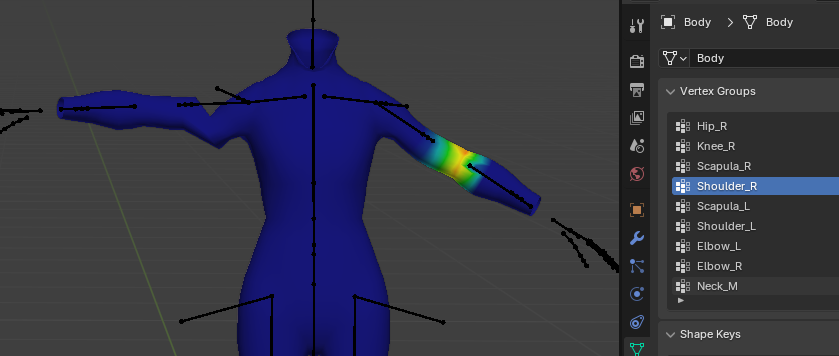
So we have to find the actual bone that is missing weights. You can look at a vanilla mesh’s weights to see how things should be weight painted. In our case, the opposing arm has correct weights so we will check that insted.
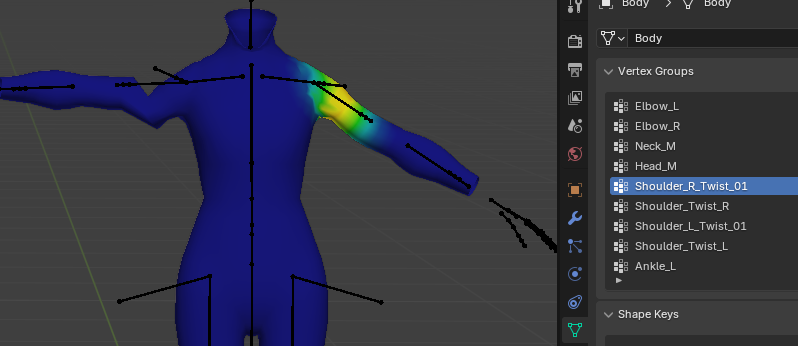
Here we can tell that Shoulder_R_Twist_01 is the bone that affects that upper arm area that interests us.
And indeed, when we check Shoulder_L_Twist_01, we can tell that weights are missing!
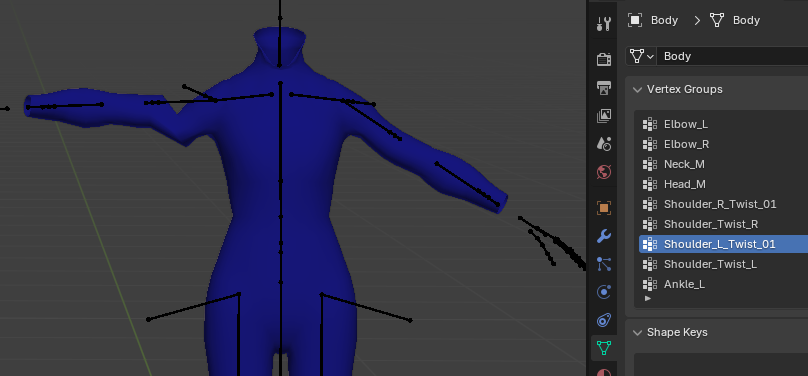
Let’s fix that!
- Select the bone that needs to have weights added to in the Vertex Groups (so in our example’s case,
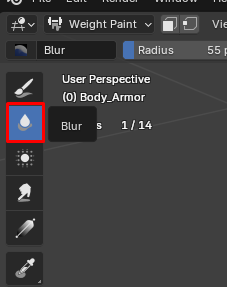
Shoulder_L_Twist_01). - Use the Draw tool and increase the weight, then draw on the mesh to add weights to it. Once that is done you may want to use the Blur tool (the droplet) to smooth out the edges.
You might need to touch up the painting on more bones to fix a single area, make sure to look at an example (like a vanilla mesh, or the opposite arm in our case), to check what the weight painting should look like.
Repeat as needed.
ㅤ
¶ Part of the armor gets deformed too much
This is the issue that arises the most after weight transfer. This problem is caused by jagged and spotty weight painting, so we will smooth the weight painting out.
- Select the armature in Object mode, then go to Pose mode and reset the pose of all bones.
Select the bones that cause the issue you want to fix and rotate them so that the issue clearly shows. Take note of the name of the bones.
For our example we will pose the armature like so, where we can clearly see the issue:
-
Exit Pose mode and go back to Object mode. The pose should stay as is.
-
Select the mesh that has problematic weights, and go to Weight Paint mode.
-
For each bone that affects the problematic area, select the Blur tool and liberally apply on the problematic area.
That should help reduce the extreme deformations.
Repeat as needed.
ㅤ
¶ Weight painting stiff armor pieces
Sometimes, you’ll want an armor piece or a belt buckle to stay rigid and not deform as the armature moves. To achieve that result, we will be using a the Average tool in Weight Painting.
- Select the armature in Object mode, then go to Pose mode and reset the pose of all bones.
- Select the bones that cause the issue you want to fix and rotate them so that the issue clearly shows. Take note of the name of the bones.
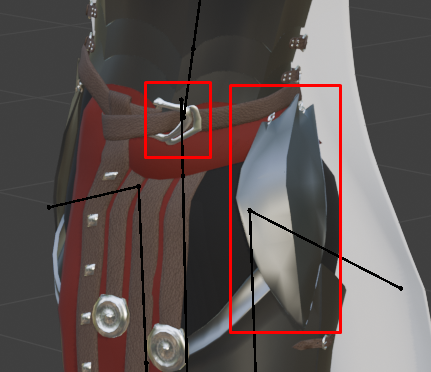
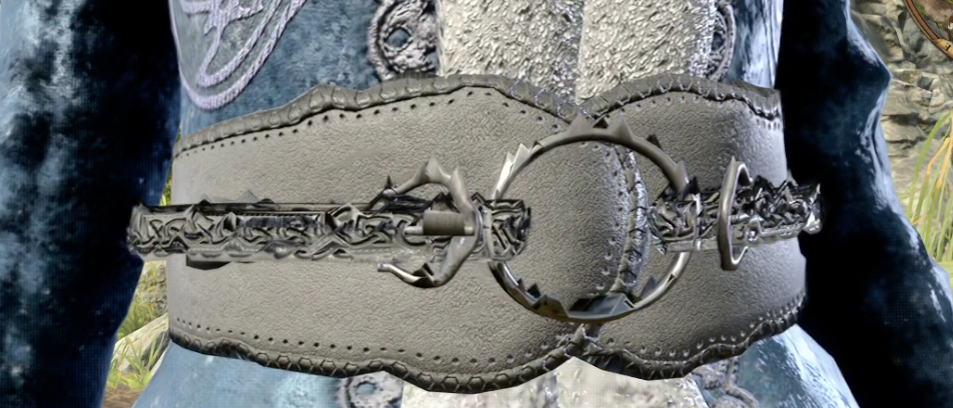
For our example we will be fixing the belt buckle and the hanging plate on the hip.
I have colored the armor to better see what is going on.
-
Exit Pose mode and go back to Object mode.
-
Select the mesh that has problematic weights, and go to Weight Paint mode.
-
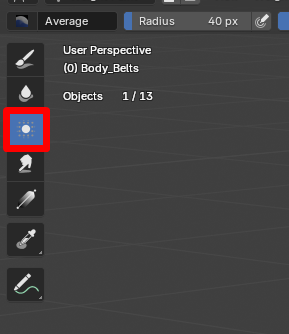
Select the
Averagetool
-
Apply the average tool on the area you want to stay stiff for all the bones that affect it.
-
Do this for all mesh parts that need to stay rigid.
The downside is that the rigid part might now clip through the other meshes. That is a tradeoff you have to consider when using this method.
ㅤ
¶ Limiting weights
Once you have finished weight painting, it’s time to limit weights. This operation is mandatory, as each vertex cannot be affected by more than 4 bones at the same time due to a limitation of the GR2 format.
Make sure that you are done with all your weight painting before limiting weights.
This operation is desctructive and will change your weight painting. Make sure to save a copy of your blend file beforehand.
Do the following for all your custom armor meshes:
-
Select your custom armor mesh and go into Weight Paint mode.
-
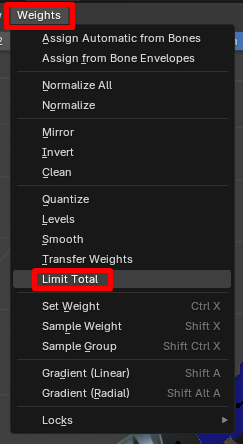
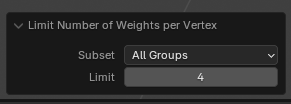
Go into
Weights>Limit Total
-
A window should have appeared on the bottom left of your viewport. You should not have to change any settings there.
ㅤ
¶ Final touches
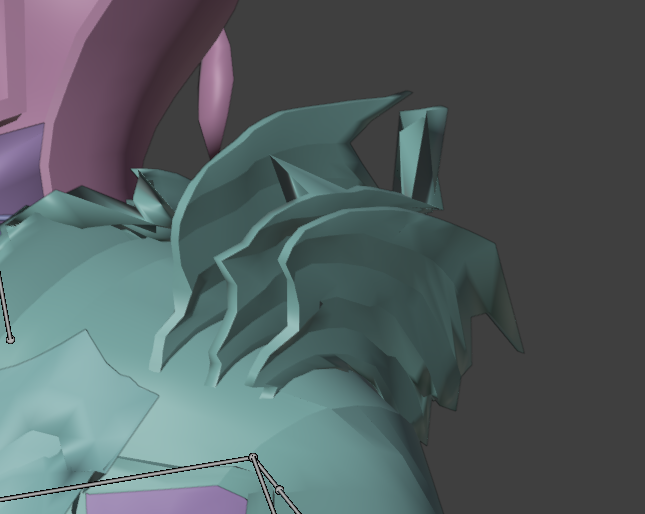
We are done with weight painting the custom armor! You should now be able to export it and test it ingame.
Once your armor is in the game, you might encounter an issue where your custom armor is all spikey like in the picture below:
To fix this, you might want to go back to the previous section and Limit Weights to 2 instead of 4.
That is all for this tutorial! Hopefully that helped you weight paint your armor. Please join the BG3 Modding Community discord if you have specific questions about weight painting.